
DMARC Broke After a Microsoft 365 Tenant Migration


Organizations often migrate their Microsoft 365 tenant into a different tenant after a company restructuring, consolidation, or acquisition by a new business. The tenant migration includes, among other things, updating domains, DNS records, and mail routing where necessary to ensure a working email channel.
Key Takeaways
- A Microsoft 365 tenant migration invalidates DKIM CNAME values created in an old tenant;
- DKIM authentication continues to pass, but DKIM alignment fails after migration;
- DKIM CNAME values must be re-created in a new tenant and updated in DNS;
- Gateways, outbound connectors, and transport rules can intercept outbound mail and break DKIM;
- Microsoft 365 email forwarding process breaks SPF and sometimes DKIM;
- DMARC report analysis helps in monitoring DKIM outcomes during and after migration to ensure DKIM is set up correctly in a new tenant.
At first glance, a Microsoft 365 tenant migration runs flawlessly and doesn’t impact an organization’s email setup. However, email messages sent from an organization’s domain can soon start bouncing with DMARC bounce errors.
As a rule, the analysis of DMARC reports shows that the emails are no longer signed with DKIM on behalf of the organization’s domain. This indicates that a DKIM configuration is no longer valid and can cause DMARC authentication failures.
Thus, SPF, DKIM, and DMARC do not automatically become correctly configured just because the domain is migrated to a new tenant. A misconfigured cutover can cause authentication failures, disrupted email flow, or messages being rejected or filtered as spam.
What Actually Changes When a Domain Moves Between Microsoft 365 Tenants
When a domain migrates from one Microsoft 365 tenant to another, the domain name itself and its registrar do not change. What changes is domain ownership in Microsoft 365. After the migration, a new Microsoft 365 organization controls the domain and uses it for email addresses, user identities, and related services.
A tenant migration also affects user accounts, mailboxes, DNS records, and Microsoft 365 permissions. While email addresses remain the same, the corresponding recipients must be configured in a new tenant. User accounts and mailbox history must be migrated separately. Access rights, groups, sharing links, and application permissions may need to be recreated or adjusted after migration. DNS records need review, and some of them must be updated.
An SPF record remains valid. It just needs to be reviewed to confirm it authorizes all legitimate outbound email senders.
A DMARC record also stays unchanged. The existing policy, alignment mode, and reporting address should be verified to ensure authentication and reporting continue to work.
What actually breaks is DKIM. DKIM keys and corresponding CNAME records are associated with a tenant and don’t migrate to a new one.
New DKIM keys must be generated in a new Microsoft 365 tenant. In DNS, new CNAME records must be published.
What Happens if DKIM is not Updated
If DKIM is not configured in a new Microsoft 365 tenant, Microsoft still puts an organization’s domain in the header From: field, but signs outbound emails on behalf of the <tenant>.onmicrosoft.com domain. Emails pass DKIM authentication without issues.
However, DKIM alignment fails because the domains in two places don’t match. Such failures can be determined by analyzing DMARC reports.
For faster analysis, use a DMARC XML report analyzer that turns raw XML files into understandable reports classifying the email sources as known, unknown, or forward, and providing detailed views by provider, source IP, or reporter.
When reading a DMARC report, notice the domain in the <header_from> tag, the DKIM domain in the <auth_results> tag, and the DKIM result in the <policy_evaluated> tag.
Example:
<header_from>: company.com
<auth_results><dkim>: target.onmicrosoft.com
<policy_evaluated><dkim>: fail
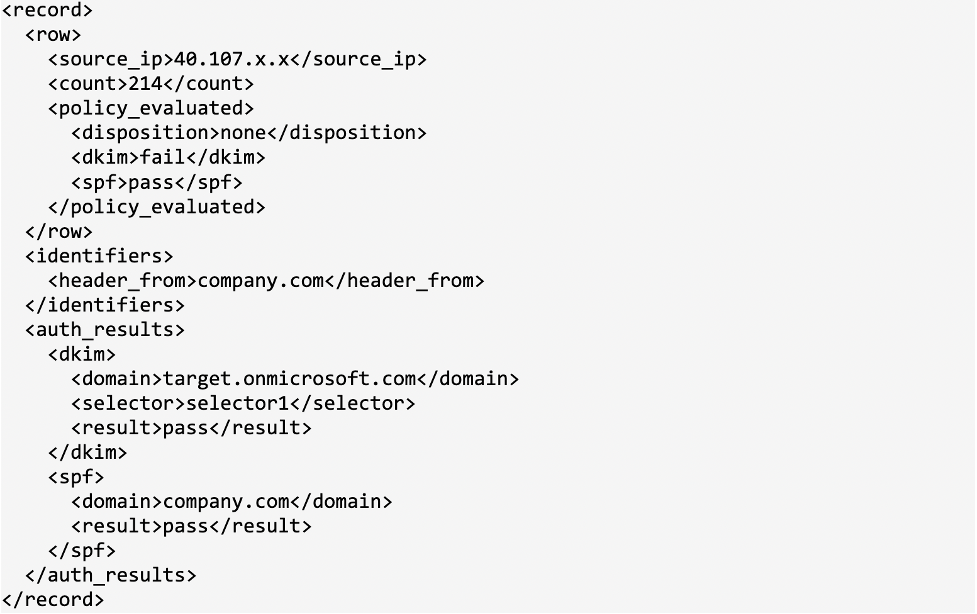
DMARC aggregate report: DKIM alignment failure
DKIM alignment failures don’t necessarily lead to DMARC failures. But some inbox providers can reject an email if it didn’t pass the DKIM alignment test. For instance, an Outlook 550 5.7.515 bounce code indicates that the sender’s domain doesn’t meet the required authentication level.
Why DMARC Looks Fine at First
At the initial stage, the emails sent by a new Microsoft 365 tenant can pass DMARC authentication based on SPF alignment.
A Microsoft 365 tenant migration doesn’t invalidate the SPF record published for a “Mail FROM” domain. The “include:spf.protection.outlook.com” mechanism is the same for all tenants.
Microsoft 365 still puts an email address set up on the organization’s domain in “Mail FROM.” This lets direct outbound emails pass SPF alignment and DMARC.
But this does not guarantee all emails sent from a new tenant after migration will pass DMARC.
Five Scenarios Why DMARC Breaks
Email forwarding, mailing lists, gateways, and relays not listed in the SPF record can cause DMARC failures under some circumstances. DMARC can still pass by SPF alignment, but there is a high risk of failure if SPF fails, too. With a p=quarantine or a p=reject policy, this results in lost messages that go unnoticed for days.
Below are five scenarios why DMARC can fail after a Microsoft 365 tenant migration:
1. DKIM is not enabled in the target tenant, CNAME points to the old tenant.
Symptom: DMARC reports start showing <target>.onmicrosoft.com as a DKIM signing domain or reporting that a DKIM signature is missing. The <policy_evaluated><dkim> tag shows “fail.”
Cause: CNAME records published in DNS point to the Microsoft DKIM endpoints that have the old tenant’s name.
selector1-yourdomain-com._domainkey.oldtenant.onmicrosoft.com
selector2-yourdomain-com._domainkey.oldtenant.onmicrosoft.com
How to fix:
- In Exchange Online PowerShell, run the following command:
New-DkimSigningConfig -DomainName yourcompany.com -Enabled $false
-
Copy the Selector1CNAME and Selector2CNAME values for the domain from the output of the command from Step 1.
-
Publish two CNAME records in the domain’s DNS:
Hostname: selector1._domainkey
Value: <Selector1CNAME value>
Hostname: selector2._domainkey
Value: <Selector2CNAME value>
Microsoft 365 will detect the new CNAME records you created in a few minutes (sometimes, it takes a bit longer).
- Go to Exchange Online PowerShell and run the following command:
_Set-DkimSigningConfig -Identity yourcompany.com -Enabled $true_
If Microsoft 365 detects the new CNAME records in DNS, the command runs without errors. Now outbound emails will be DKIM-signed on behalf of your custom domain.
- To verify if a new domain was set up for DKIM, run the command from Step 1 again. The output should return these domain values:
Enabled: True
Status: Valid
Important notes:
-
Delete old DKIM-related CNAME records with selector1 and selector2 from DNS before adding new ones.
-
Always copy and paste the CNAME values instead of typing manually to avoid syntax errors.
2. DKIM=Fail is returned during the first few hours after DKIM activation.
Symptom: the Authentication-Results header field shows dkim=fail, DMARC reports indicate failure for DKIM authentication
<auth_results><dkim>fail</dkim>.
Cause: The DKIM selectors’ names are the same in an old and a new tenant (selector1._domainkey, selector2._domainkey). The resolving server cached an old CNAME endpoint and tries to verify a new DKIM signature with an old DKIM key. This returns dkim=fail.
How to fix: Decrease TTL for DKIM CNAME records in advance. The recommended TTL for these records is at least 3600 seconds (1 hour). If you have a higher value, decrease TTL to 3600 seconds roughly 48 hours before the tenant migration.
3. A target tenant gateway intercepts outbound emails.
This is a typical scenario when a new Microsoft 365 tenant routes outbound mail through Mimecast, Proofpoint, Barracuda, or another gateway through an outbound connector.
Symptom: the Authentication-Results header field shows spf=fail or spf=softfail. A DKIM result depends on who signs emails with DKIM.
Cause:
-
a gateway is not authorized by SPF;
-
a DKIM signature becomes invalid after a gateway’s interception;
-
DKIM signing is not configured on a gateway.
How to fix:
-
Add the gateway’s IP address to the SPF record published on a header From: domain and on a custom “Mail FROM” domain.
-
Ensure a DKIM signature is added by the final sending node after all content transformations are complete, or strip old signatures and re-sign if a gateway modifies the message.
Important notes:
-
Keep the SPF DNS lookup limit in mind when updating the SPF record. More than 10 lookup requests can result in SPF failures.
-
Use a free SPF checker to validate the SPF record after the update.
4. A domain rewrite’s relay is not authorised by SPF and DKIM.
Rewrite services route outbound emails through their relays using transport rules and connectors. Thus, you have one more hop that needs to be authorized.
Symptom: the Authentication-Results header field shows spf=fail, dkim=fail, dmarc=fail. DMARC reports indicate failures for SPF and DKIM:
<policy_evaluated>
<spf>fail</spf>
<dkim>fail</dkim>
Cause:
-
a domain rewrite service overwrites the “Mail FROM” domain, which causes SPF alignment to fail;
-
a domain rewrite service changes the email content (HTML, URLs, headers, etc.) after the message is signed with DKIM; the DKIM signature becomes invalid.
How to fix:
-
Add the relay’s IP address to the SPF record published on a header From: domain and on a custom “Mail FROM” domain. Ensure the SPF record complies with the 10 DNS-lookup limit to avoid failures.
-
Ensure a DKIM signature is added by the final sending node after all content transformations are complete, or strip old signatures and re-sign if a relay modifies the message.
5. Applications and SaaS are still sending mail through an old tenant.
Symptom: emails bounce, a non-delivery report (NDR) shows the following error:
550 5.7.64 TenantAttribution; Relay Access Denied SMTP
Cause:
-
an inbound connector in Microsoft 365 verifies the identity of the server submitting an email by a certificate on-premises. Due to a configuration change or a new certificate that uses a different name, the certificate on-premises no longer matches the certificate specified in Microsoft 365;
-
an inbound connector in Microsoft 365 verifies the identity of the server submitting an email by an IP address. The IP configured in the Microsoft 365 connector no longer matches the IP address being used by the submitting server.
How to fix:
-
Ensure the certificate subject name (CN or SAN) matches the one specified in the connector.
-
Verify that the public IP address listed in the connector matches the actual external/NAT IP address your sending server currently uses. Update it if your ISP changed your public IP.
-
Ensure the SPF record includes the outgoing IP address or smart host/relay domain you are using to route through Microsoft 365.
Not every *.onmicrosoft.com signature is yours
This scenario stands separately as it isn’t directly related to a Microsoft 365 tenant migration.
DMARC can break in the result of email forwarding by Microsoft 365.
When an email is sent to a Microsoft 365 mailbox and then gets forwarded, Microsoft 365 uses SRS (Sender Rewrite Scheme) and rewrites the Envelope From (Return-Path) address to something like SRS0=hash=tt=originaldomain=user@yourtenant.onmicrosoft.com.
The receiving server then evaluates SPF against the rewritten domain, which does authorize Microsoft’s IPs. SPF passes, but it’s aligned with the tenant domain, not the original From domain, which leads to SPF alignment failure.
DKIM signs the message headers and body, and the signature travels with the message. If the forwarder doesn’t alter the signed parts, DKIM survives and validates the email by DMARC at the final destination, regardless of the IP it came from.
DKIM can break if the forwarder:
- modifies the subject (e.g., adds “FW:” or “[External]” tags);
- appends a footer/disclaimer or alters the body in another way;
- rewrites the HTML or re-encodes content;
- resends the email as a new message or attachment rather than forwarding it directly.
How to differentiate a Microsoft 365 tenant migration from forward
After migration:
- SPF authentication and alignment don’t break;
- Emails are signed with a *.yourtenant.onmicrosoft.com domain;
- The tenant
<yourtenant>in the signing domain is the same; - DMARC can pass by SPF.
After forward:
- SPF authentication passes, SPF alignment fails;
- the Envelope From domains (*.yourtenant.onmicrosoft.com) in different messages show different tenants;
- DKIM can pass or fail depending on how Microsoft 365 handles email forwarding;
- DMARC can pass by DKIM.
Diagnose It in Ten Minutes
Below is the summary of all scenarios in which DMARC breaks after a Microsoft 365 tenant migration so you can quickly identify yours.
Scenarios for DMARC Failures After a Microsoft 365 Tenant Migration
DKIM Fix: Operations after Cutover
After your domain was moved to a new tenant and was verified in that tenant, take these steps to avoid common pitfalls and authentication failures:
1. Get the DKIM CNAME values.
In the Microsoft Defender portal, go to Email & collaboration > Policies & rules > Threat policies > Email authentication settings > DKIM and select the domain.
Or in Exchange Online PowerShell, run this command:
Get-DkimSigningConfig -Identity yourdomain.com | Format-List Selector1CNAME, Selector2CNAME
If no config exists for the domain, create it with this command:
New-DkimSigningConfig -DomainName yourdomain.com -Enabled $false
2. Replace the old DKIM DNS records.
In DNS, find CNAME records pointing to the old tenant (selector1._domainkey and selector2._domainkey).
Edit them to point to the new tenant’s values.
Format: selector1-yourdomain-com._domainkey.<tenant>.onmicrosoft.com.
Important notes:
- Don’t add duplicate DKIM CNAME records;
- Copy exactly what the Defender portal or PowerShell shows. The value contains the new tenant’s onmicrosoft.com name and, for domains created after mid-2023, may use the .n-v1.dkim.mail.microsoft style;
- Keep both selectors; Microsoft rotates between them.
3. Wait for DNS propagation.
It takes from minutes to a few hours (up to 48h at worst).
Check your DNS records with a DNS checker.
4. Enable DKIM signing.
In the Defender portal, toggle “Sign messages for this domain with DKIM signatures” to Enabled.
Or in Exchange Online PowerShell, run this command:
Set-DkimSigningConfig -Identity yourdomain.com -Enabled $true
If it returns an error like “CNAME record does not exist,” DNS hasn’t propagated yet, or the entered values are wrong.
Recheck step 2.
5. Verify.
Send a test message to an external mailbox (Gmail works well), view the original headers, and check the Authentication-Results: header to confirm dkim=pass header.d=yourdomain.com.
Check the s= selector in the DKIM-Signature header matches one of yours.
Checklist for Your Next Migration
- 30 days prior to migration, export all email sources from DMARC reports and note all sources sending through Microsoft 365;
- Check outbound flow of the target tenant: outbound connectors, gateways, transport rules;
- Make a list of applications and devices sending mail via the source tenant;
- 48 hours prior to migration, decrease TTL for the existing DKIM CNAME records to 3600 if it’s higher (3600 TTL is recommended by Microsoft);
- Make sure the rua= email address in the DMARC record doesn’t point to the migrating domain (DMARC reports are dropped while migrating, which leads to critical data loss);
- After the domain verification in a new tenant, create CNAME record values, publish them in DNS, and enable DKIM signing.
- Decide on a DMARC policy in advance. By default, it remains intact - the period without DKIM alignment is short. If a testing mode is needed, use the t=y tag to set the monitoring mode (equals to pct=0);
- During the 14 days after migration, watch DKIM alignment for Microsoft 365 to ensure it is back to the pre-migration level;
- If the old tenant still had DKIM enabled for the migrated domain, disable it there before removing the domain, to avoid confusion;
- Rotate keys later with the Rotate-DkimSigningConfig command if you want to refresh them after migration.
Conclusion
A Microsoft 365 tenant migration process usually involves a planning phase, a series of migration batches, and a final cutover where the domain and DNS records switch over. Because the custom domain moves from one tenant to another, DKIM CNAME records have to be updated to point to the new tenant after the migration.
Use DMARKOFF for report processing and verifying DKIM alignment during and after migration to ensure DKIM signing is set up correctly in a new tenant.
Start Your 14-Day Free Trial
FAQ
No. A domain can only be verified in one tenant at a time. During coexistence, a common workaround is to use a subdomain in the target tenant, then move the primary domain at cutover.
It’s good practice to disable it before removing the domain. It isn’t strictly required, but it avoids stale signing configs and confusion while you troubleshoot.
Possible causes are:
- DNS hasn’t propagated yet;
- The CNAME values don’t exactly match what the Defender portal or Get-DkimSigningConfig in PowerShell returned;
- The record was created at the wrong level (for example, your DNS host appended the domain twice, producing selector1._domainkey.yourdomain.com.yourdomain.com);
- The domain isn’t verified or active in the new tenant yet
It’s optional. A new tenant already generates new keys, but you can run Rotate-DkimSigningConfig -KeySize 2048 -Identity yourdomain.com to ensure you’re on 2048-bit keys.

Author of numerous articles on email deliverability and email authentication. She is known for her practical, data-driven approach that helps teams get more emails into inboxes and keep sending practices healthy.
Julia works closely with senders every day, providing technical support, troubleshooting deliverability issues, and making complex topics such as email infrastructure, authentication, and sender reputation easier to understand and deal with.