
How to Set up DMARC for a Domain: Quick 3-Step Guide



Setting up DMARC is one of the most important steps for protecting your domain from spoofing, phishing attempts, and unauthorized email use. However, publishing a DMARC record is only the beginning. A proper DMARC setup requires three steps: creating the record, adding it to your DNS, and monitoring the reports to understand who is sending email from your domain.
This guide covers everything you need to configure DMARC for your domain correctly: how to create a DMARC record, how to publish it in DNS, and how to analyze the reports it generates.
Key Takeaways
- DMARC is a DNS-published policy that tells receiving mail servers how to handle messages that fail SPF or DKIM authentication.
- Setting up DMARC requires creating a TXT record and publishing it in your domain's DNS settings.
- The latest DMARC specification (RFC 9989) updated the record structure, introducing new tags and retiring some, so it's worth reviewing your DMARC settings even if a record is already published.
- Starting with p=none lets you monitor email traffic without affecting delivery, which is the recommended approach for new deployments.
- DMARC reports reveal every source sending email on behalf of your domain, including unauthorized ones.
- Publishing the record is only the beginning. Ongoing report analysis is essential.
What Is a DMARC Record?
A DMARC (Domain-based Message Authentication, Reporting, and Conformance) record is a DNS TXT record that domain owners publish to define their email authentication policy. It works alongside SPF and DKIM, two protocols that verify the authenticity of email messages, and tells receiving mail servers what to do when a message fails those checks.
A typical DMARC record example looks like this:
v=DMARC1; p=reject; rua=mailto:xxx@ar.dmarkoff.com;
ruf=mailto:xxx@fr.dmarkoff.com; adkim=r; aspf=r; np=reject;
Key DMARC Tags Explained
Every tag in a DMARC record controls a specific aspect of how policy is applied, where reports are sent, and how receivers handle subdomain and alignment edge cases:
- v=DMARC1 - identifies the record as a DMARC policy record (required)
- p= - the policy applied to messages that fail authentication: none (monitor only), quarantine (send to spam), or reject (block the message)
- rua= - specifies where aggregate DMARC reports should be sent. These reports provide visibility into sending sources, authentication results, and alignment issues.
- ruf= - optional; specifies where failure (forensic) reports should be sent. Most major mailbox providers, including Google, Microsoft, and Yahoo, no longer send these reports due to privacy and operational considerations.
- adkim= and aspf= - define alignment requirements for DKIM and SPF, where r - relaxed alignment (default) and s - strict alignment.
- np= - new tag, that defines a policy specifically for non-existent subdomains, protecting against spoofing attempts that use subdomain names that don't actually exist (e.g., np=reject). If the np tag is absent, receivers fall back to sp, or to p if sp is also missing.
- sp= - optional; a separate policy for subdomains that exist
- t= - new flag introduced for testing mode (not a percentage equivalent).
- t=y enables testing mode, where the enforcement action is reduced by one level (reject is treated as quarantine, and quarantine is treated as none).
- t=n (default) means the published DMARC policy is applied normally.
- psd= - new tag that identifies whether a domain is a Public Suffix Domain (a domain under which third parties can register subdomains, such as .com). Mainly relevant to registry operators rather than typical domain owners.
Key DMARC Record Changes in RFC 9989
DMARC is now governed by RFC 9989, RFC 9990, and RFC 9991, which replaced the original RFC 7489 specification published in 2015. This update moved DMARC from an Informational RFC to a Proposed Standard on the IETF Standards Track, giving the specification a more formal standards status. The core mechanism remains the same, but the new specification introduces updated record syntax, a revised policy discovery method, and several new and retired tags.
The following tags have been retired in RFC 9989:
- pct= - percentage-based enforcement
- rf= - reporting format
- ri= - requested report interval
Existing DMARC records that include these tags may continue to work, but receivers are no longer required to process them.
For better alignment with the current specification, review your DMARC configuration and remove retired tags when updating your record.
Under RFC 9989, receiving servers locate your DMARC policy using a method called DNS Tree Walk. This hierarchical DNS lookup climbs the domain hierarchy until a valid policy record is found, rather than relying on the external Public Suffix List used under RFC 7489.
This gives domain owners more flexibility, particularly those with complex, decentralized DNS structures, since DMARC policy records can now be published at multiple points in a namespace. The walk is capped at 8 queries to prevent abuse.
The practical implication for domain owners: because receivers running RFC 9989 may calculate a different Organizational Domain boundary than those still on RFC 7489, the safest approach is to publish an explicit DMARC record at every domain and subdomain you actively send email from.
Which DMARC Policy to Choose and When to Move to Full Enforcement
When you first configure DMARC for a domain, p=none remains the right starting point. It activates reporting without risking any mail being filtered or rejected before you've confirmed all your legitimate senders are properly authenticated.
During this monitoring stage (at least one month, depending on email volume), focus on these things:
- Identify every legitimate sending service
- Fix SPF/DKIM alignment issues
- Remove unknown or unauthorized senders
- Verify third-party platforms (CRMs, marketing tools, ticketing systems)
Only after understanding all the sending activity should you move toward p=quarantine and eventually p=reject. A rushed move to enforcement can block legitimate business emails from third-party platforms.
How to Set Up DMARC for Your Domain
Step 1: Create Your DMARC Record.
Before you can add anything to DNS, you need to generate a properly formatted DMARC record. You can do this manually or use a DMARC setup tool such as DMARKOFF to generate and validate the configuration.
To create a DMARC record with DMARKOFF:
- Log in to your DMARKOFF account (or start a 14-day free trial).
- Create a new project or open an existing one.
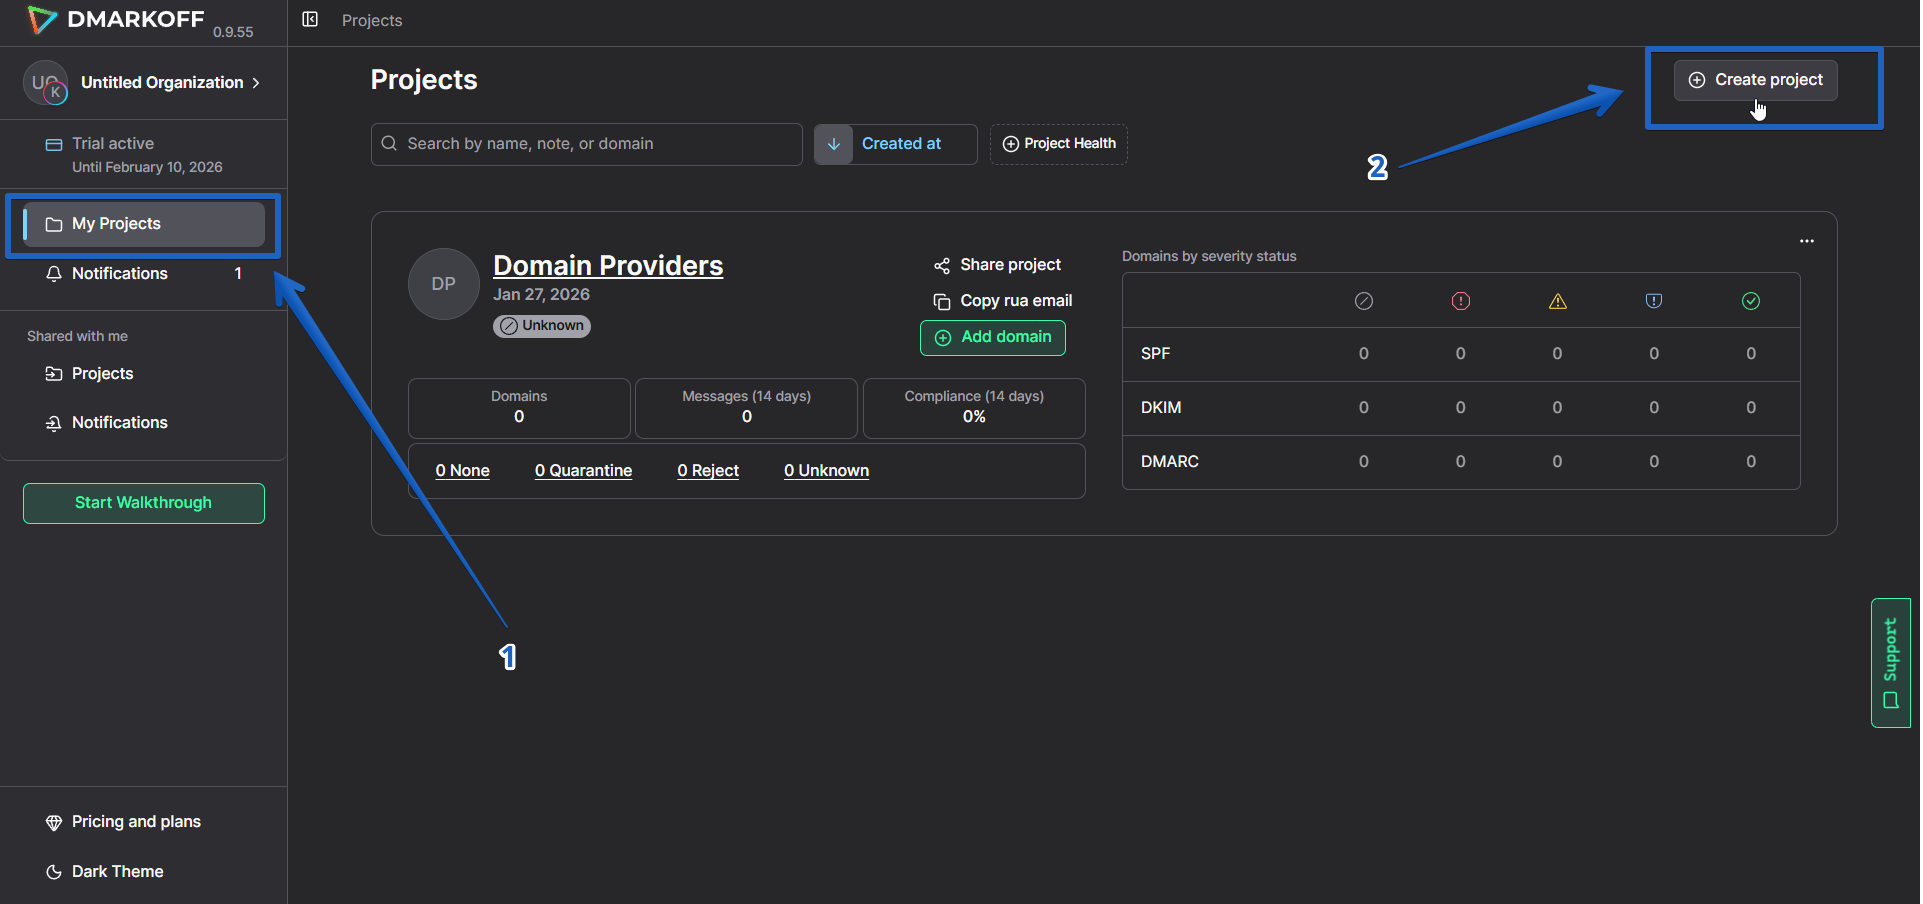
- Then click Add Domain and enter your domain name.
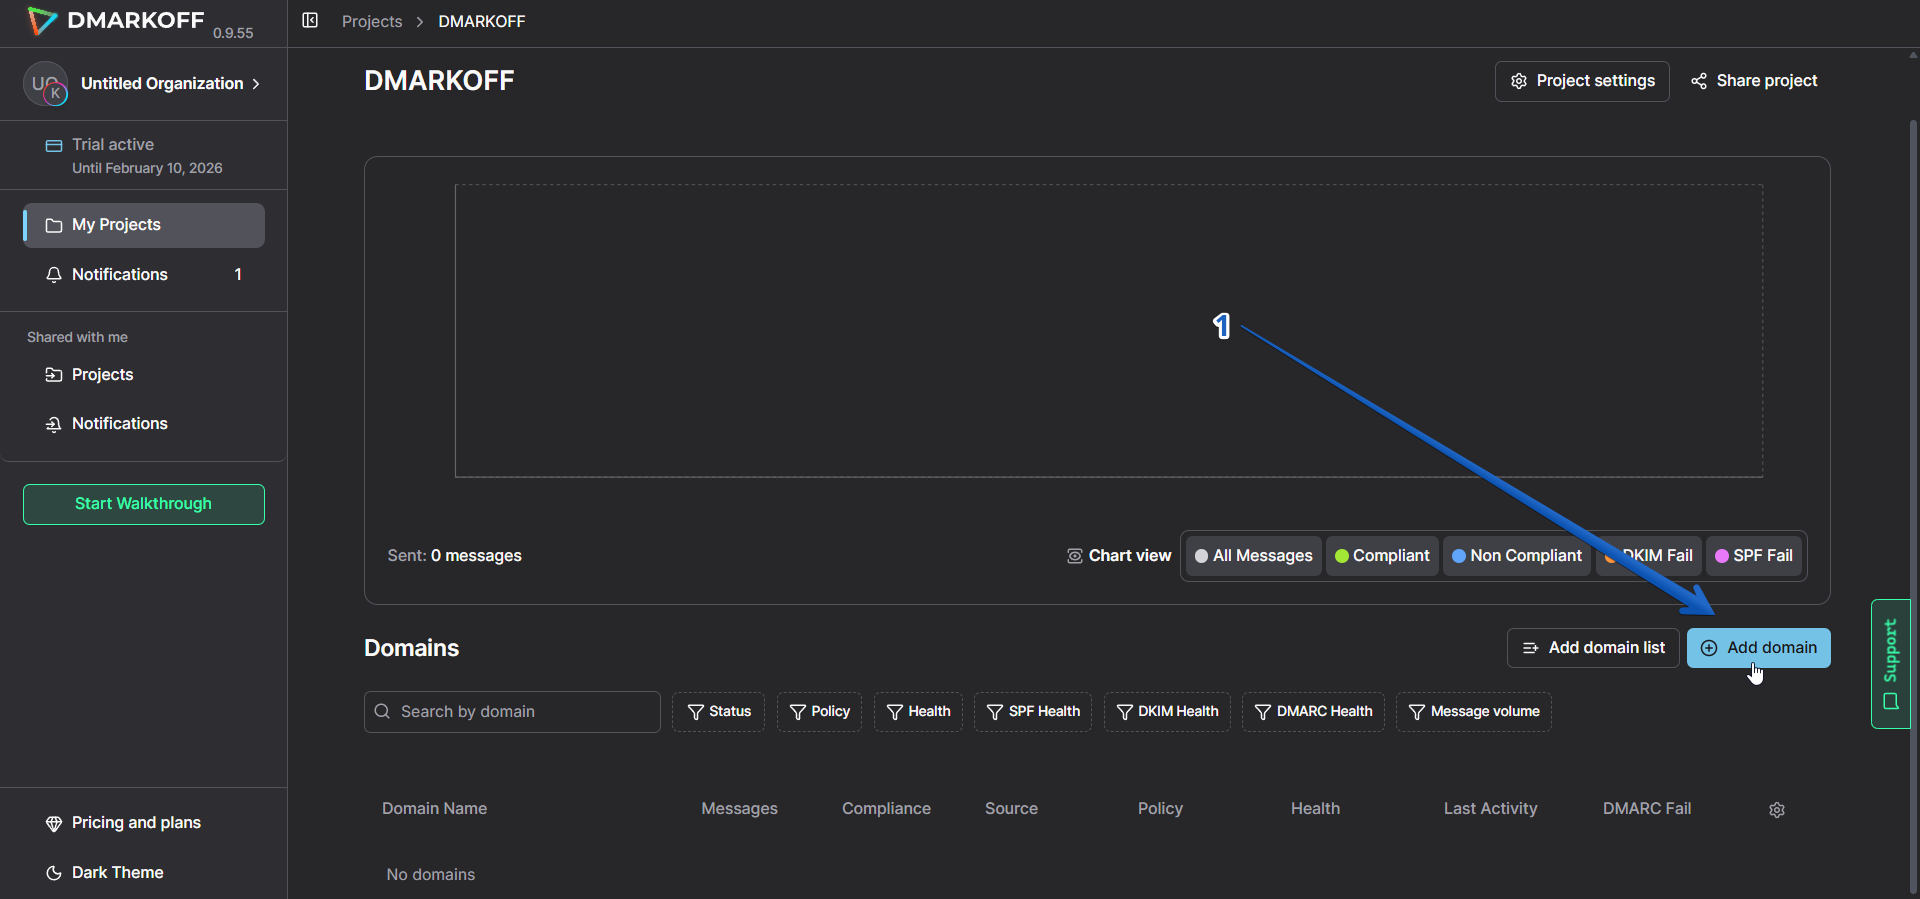
- Skip the Check Records step for now.
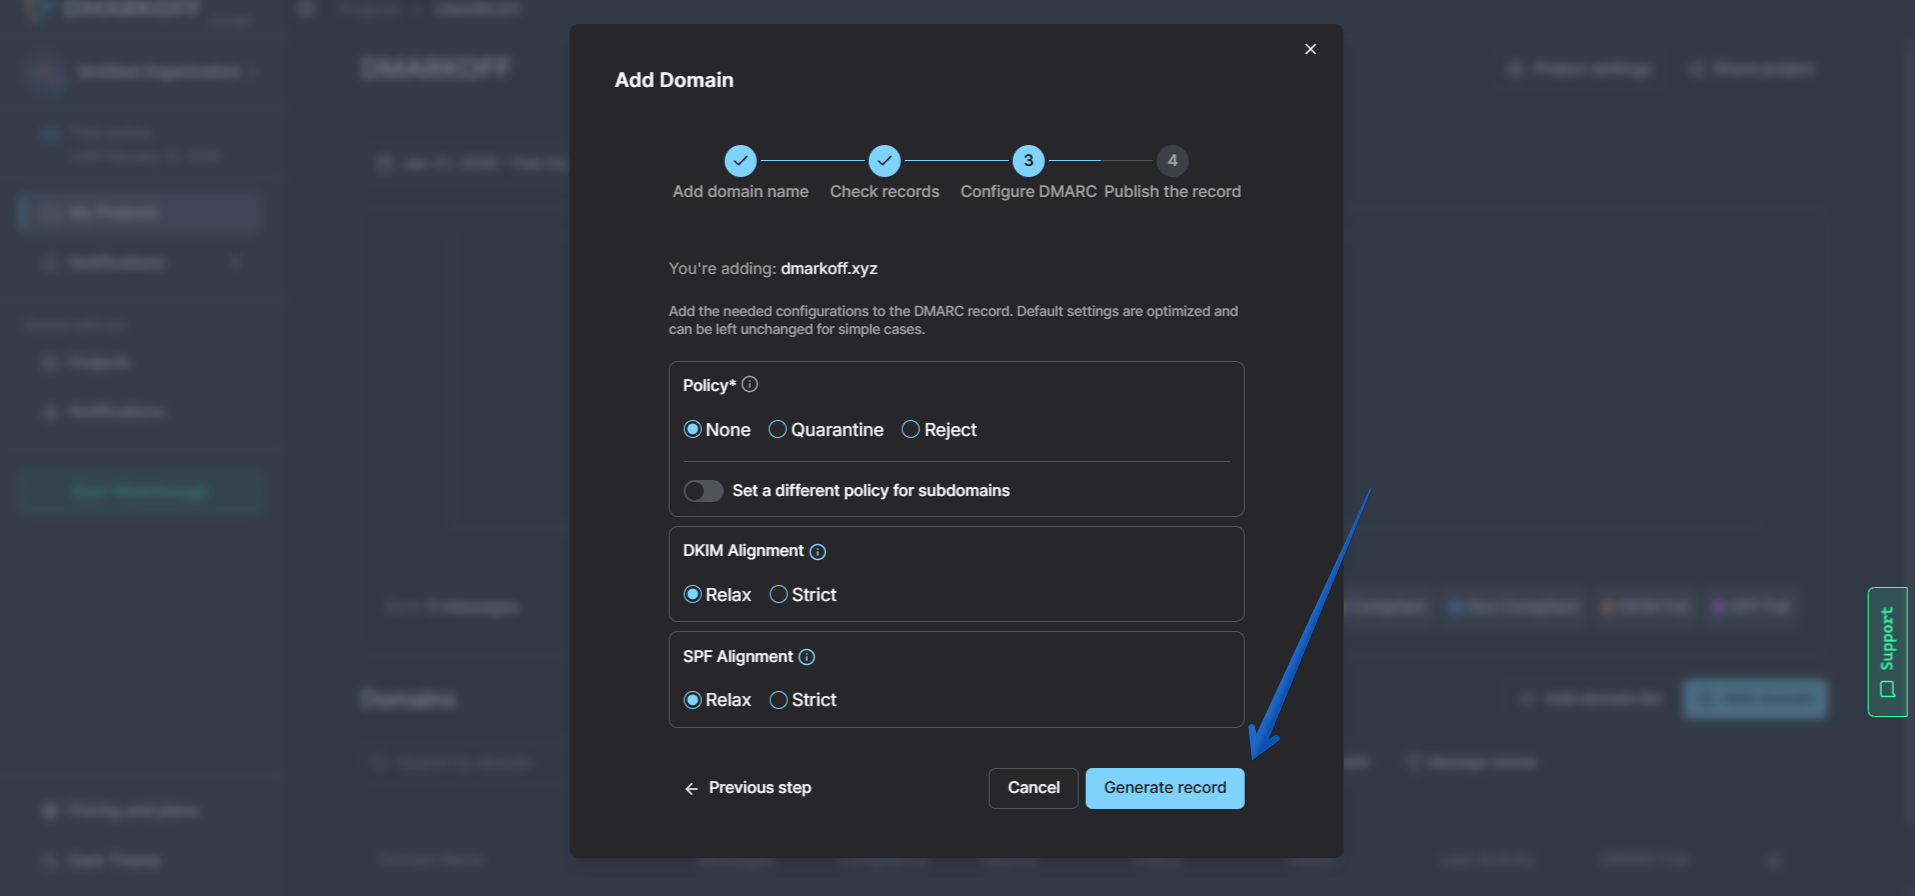
- Configure your DMARC policy settings:
Policy: Choose p=none to start monitoring without affecting delivery.
Subdomain Policy: Optionally define a separate policy for subdomains.
DKIM Alignment: Choose Relaxed (recommended) or Strict.
Relaxed alignment allows subdomains, for example, mailing list bounce addresses, to pass alignment with the primary domain.
SPF Alignment: The same choice applies here.
- Click Generate Record. The system will produce a complete, correctly formatted DMARC TXT record ready to publish.
Step 2: Add the Record to Your DNS.
Once you have your DMARC record, publish it in your domain's DNS settings. Receiving mail servers query this record to run DMARC checks on messages sent from your domain.
How to do it:
- Log in to your domain registrar or DNS hosting provider (e.g., Cloudflare, GoDaddy, Route 53, Namecheap).
- Navigate to the DNS management section and add a new TXT record with the following values:
- Host / Name: _dmarc (some providers require the full _dmarc.yourdomain.com)
- Value: the full DMARC record string generated in Step 1
- TTL: 3600 (1 hour) is standard for new records
- Save the record.
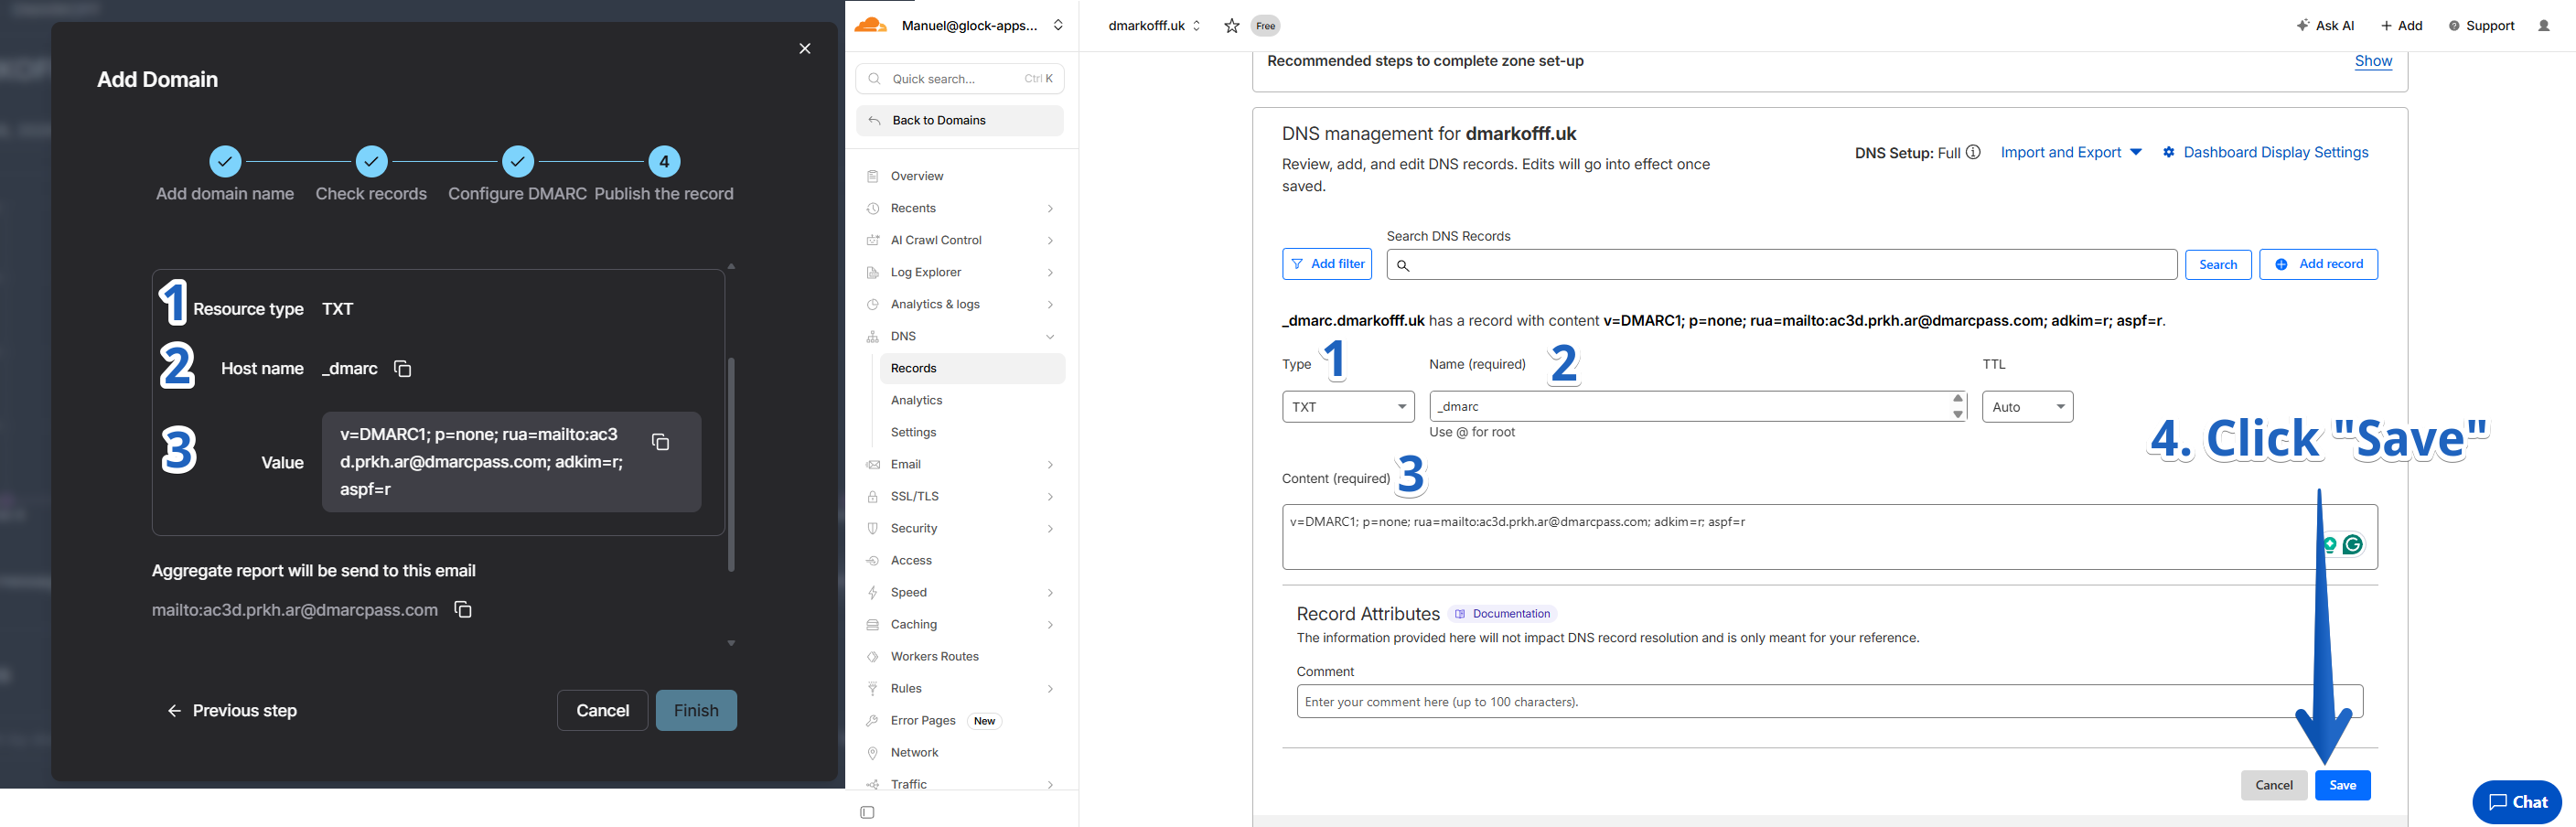
Example of How to Set up a DMARC Record in Cloudflare DNS
DNS changes typically propagate within a few minutes to a few hours, though full propagation across all resolvers can take up to 48 hours.
To verify the record is live in DMARKOFF:
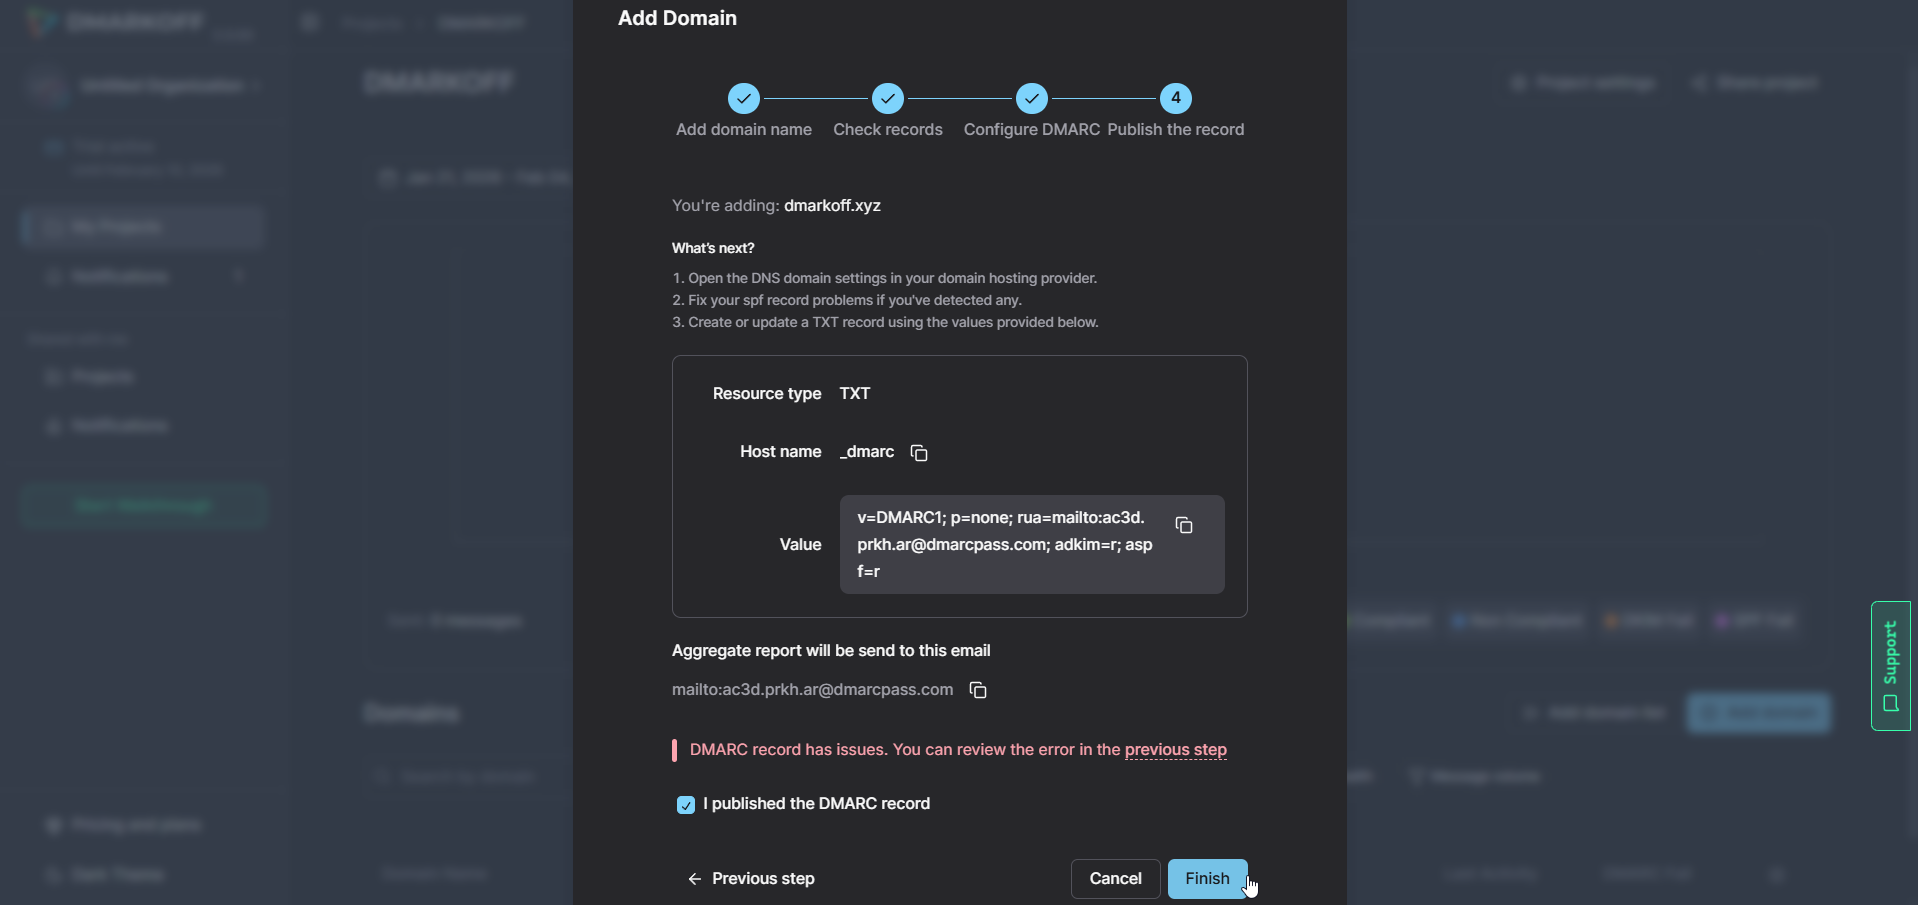
After publishing, return to your DMARKOFF account and click Finish. The domain dashboard will display your DMARC record status.
You can also hover over the checkmark next to your domain name to confirm it's active:
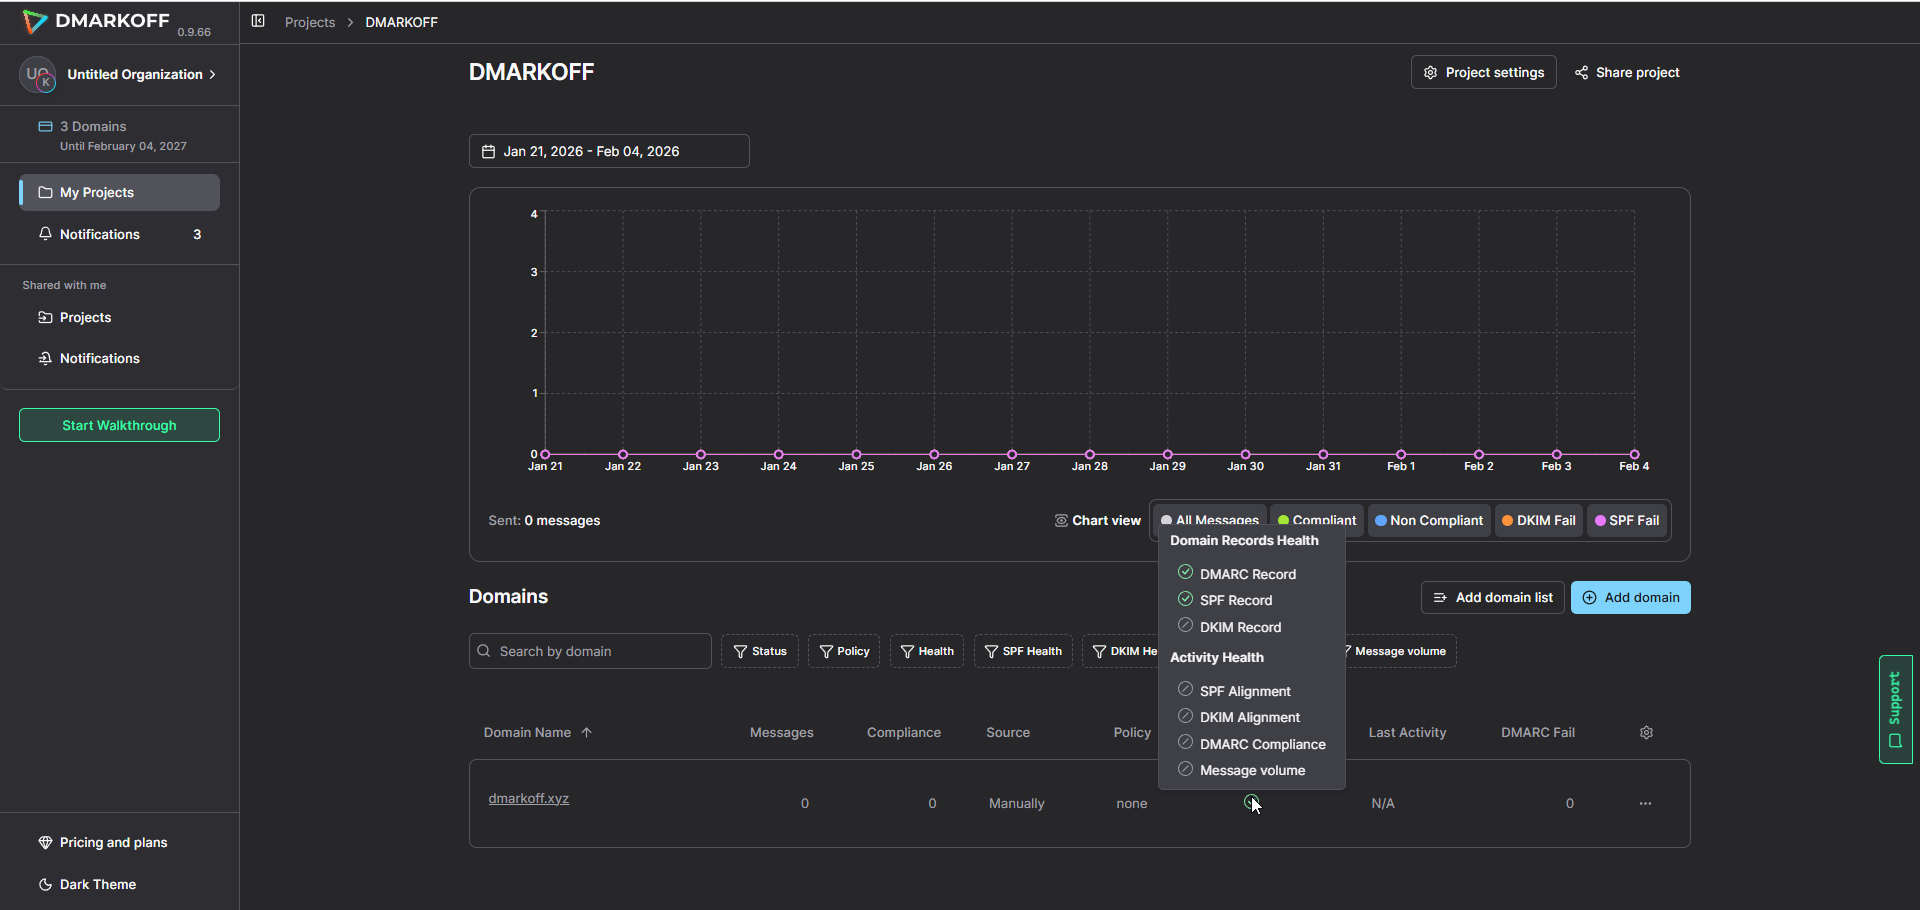
Or click into the domain and review the Domain Records Health report for a full authentication overview:
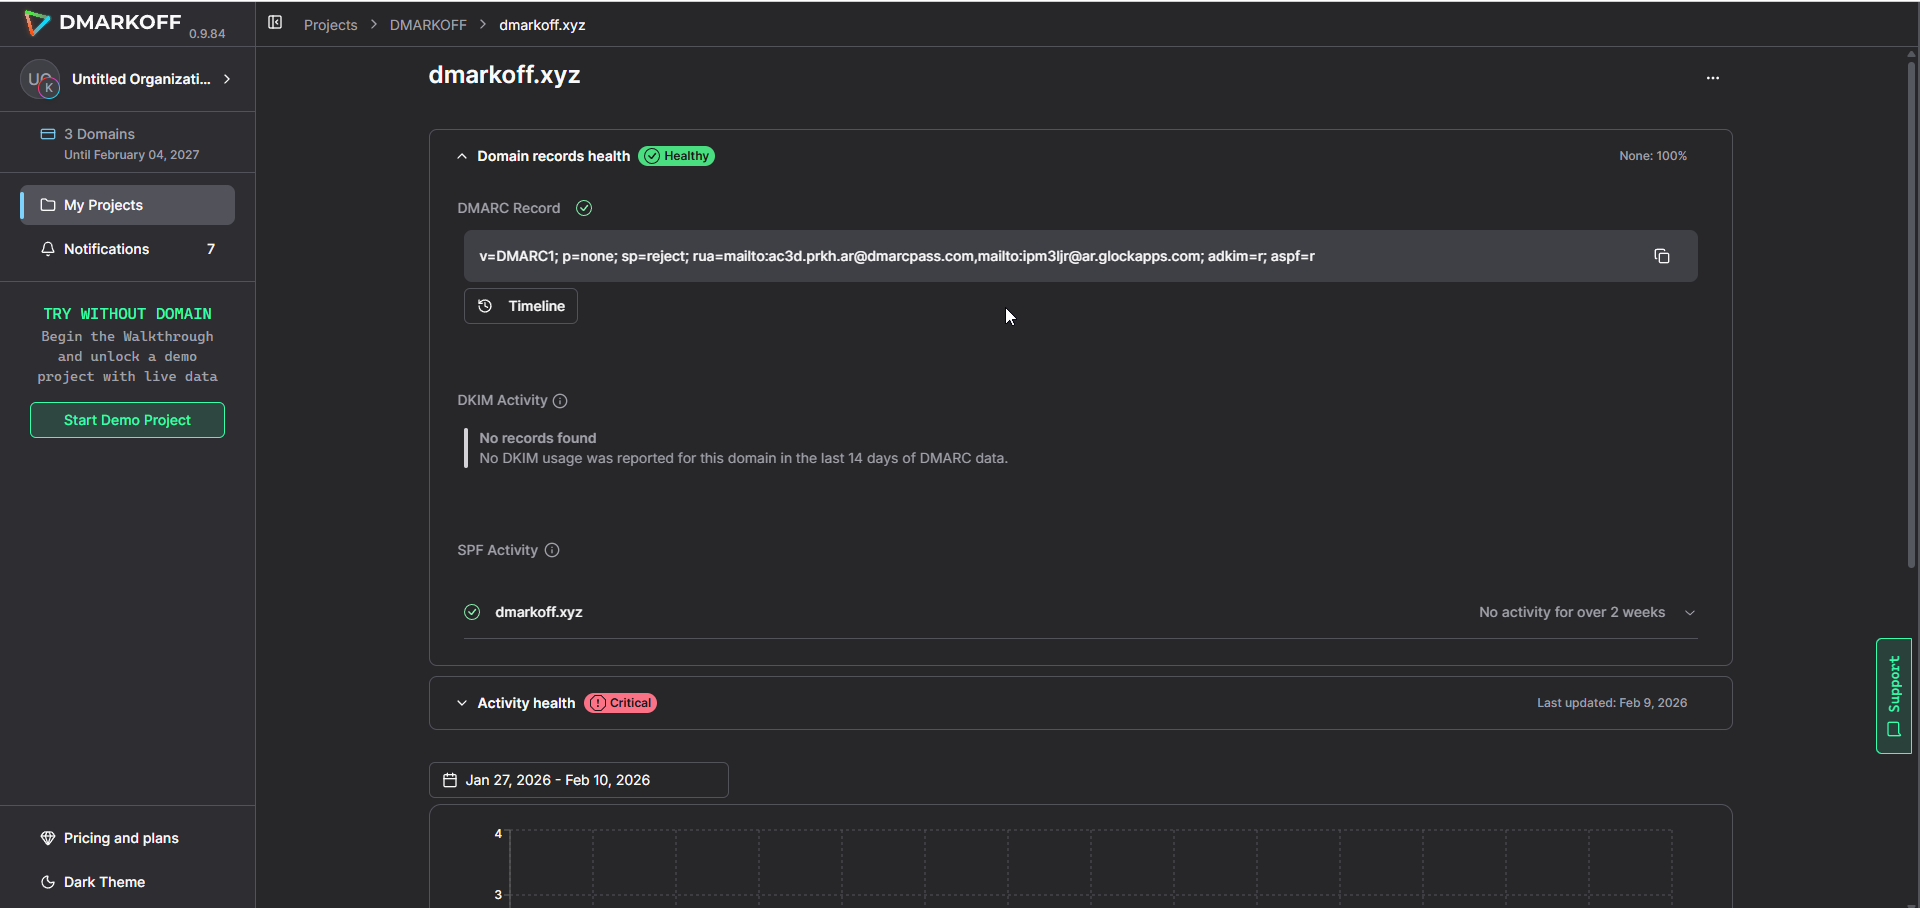
Step 3: Analyze Your DMARC Reports.
Publishing the record is only the start. The real value of DMARC comes from the reports it generates and from acting on what those reports reveal.
Receiving servers begin sending aggregate reports to the address in your rua= tag, typically within 24-48 hours. If your domain sends very low volumes, it may take a few days before you receive enough data to analyze.
These reports are delivered as XML files and contain:
- Every IP address that sent an email using your domain
- SPF and DKIM authentication results for each source
- DMARC alignment results
- How the receiving server handled each message (none, quarantine, or reject)
Reviewing raw XML manually is time-consuming and requires technical expertise, which is why we created DMARKOFF, a next-generation platform that makes DMARC monitoring accessible to all experience levels.
DMARKOFF transforms raw DMARC data into clear, actionable insights through:
- Interactive widgets showing authentication results across all your domains and sending sources
- Domain-specific filtering for teams managing multiple domains, with the ability to group domains into projects by client, brand, or department
- Automatic identification of legitimate vs. unauthorized senders: IP addresses are resolved into readable infrastructure providers and email platforms (Google Workspace, Mailchimp, Salesforce, and others)
- Customizable date ranges so you can investigate specific time periods or compare authentication performance over time
- Smart alerts that flag suspicious activity, new sending sources, and authentication failures
- Luma, a built-in AI assistant, helps interpret report data and answer questions about your authentication setup in plain language
- MCP server support for AI-powered workflows, allowing you to work directly with live DMARC data from your domains through your AI agent
Conclusion
Creating and publishing a DMARC record doesn't take long if you follow the steps in our guide. But protection starts only with ongoing DMARC report monitoring.
DMARC reporting remains essential as long as your domain exists. Active monitoring ensures that legitimate outgoing emails are not accidentally blocked and helps you catch phishing attempts and unapproved third-party apps spoofing your brand immediately.
DMARKOFF handles the complexity of report analysis, giving you a clear picture of your email authentication posture across every domain you manage.
FAQ
A DMARC record is created as a DNS TXT record with your chosen policy, reporting address, and alignment settings. A basic DMARC record includes the version tag (v=DMARC1), policy (p=), and reporting address (rua=). You can quickly generate it using DMARKOFF.
To enable a DMARC policy, you need to create and publish a DMARC TXT record in your domain’s DNS settings. Start with p=none to monitor authentication results without affecting email delivery. After reviewing DMARC reports, fixing SPF and DKIM alignment issues, and confirming all legitimate senders, you can move to enforcement with p=quarantine or p=reject.
You can publish a DMARC record without having SPF or DKIM configured, but DMARC will not pass until at least one authentication method is correctly set up and aligned.
After publishing your DMARC record, to ensure it’s working, check these two things:
1.Confirm the record is published and resolving correctly. You can do this with any DNS lookup tool by querying the TXT record at _dmarc.yourdomain.com. If it returns your DMARC policy string, the record is live.
- Check aggregate reports to understand whether authentication is actually working, meaning your legitimate mail is passing authentication and appearing in reports correctly. Look for your known sending sources showing dkim=pass or spf=pass with correct alignment against your From domain. A record that resolves in DNS but whose senders aren't authenticating is technically active but not protecting you.
DMARKOFF surfaces both sides, validating your DMARC record status and giving you visibility into authentication results across your sending sources.
Usually no. It is recommended to start with p=none to collect reports and verify legitimate senders. Moving directly to reject policy without visibility can block valid business emails.
No. Creating and implementing a DMARC record requires basic access to your domain's DNS settings. Tools like DMARKOFF generate the correctly formatted record for you, so no manual syntax knowledge is required. The more technical work is in the ongoing analysis of reports, which our platform also handles.
Most receiving mail servers send aggregate reports within 24-48 hours of receiving email from your domain. For domains with low sending volume, it may take a few days before the first reports arrive.

Author of numerous articles on email deliverability and email authentication. She is known for her practical, data-driven approach that helps teams get more emails into inboxes and keep sending practices healthy.
Julia works closely with senders every day, providing technical support, troubleshooting deliverability issues, and making complex topics such as email infrastructure, authentication, and sender reputation easier to understand and deal with.